Showing posts with label Cost. Show all posts

Thursday, July 24, 2008

Changing transmission oil on my scooter

It is normally recommended that scooter transmission oil be changed at least once a year. Once I hit 6000km - probably more then a typical year's worth of riding - and especially after that long ride to Duluth, it seemed like transmission oil change for my Baron was due.

There are three types of oil you can find in motorcycle and auto stores, besides the cleaning/penetrating types. These are various types of engine, automatic transmission fluid (ATF) and gear oil. While our scoots have "automatic" transmission, the V-belt transmission works quite different from car's AT and what I believe should be used for scooters is the gear oil. This is the stuff that goes into manual transmission boxes and perhaps other machinery. Gear oil is standardized similarly to engine oil, by a range of viscosity. I dug online a little and found suggestions to use 75 to 90 W oils for scooter transmission. This is exactly what I'll be going for.

It is a good time to remind you that I am not in any way offering a professional advice on these pages.

What I found in AutoZone was a cheep and very convenient bottle of 75-90W, exactly what I needed. It cost about $6. The most expensive one from Mobile-1 (with a larger range, up to something like 140W), was about 15$. The bottle is so big it will last a lifetime, I just wanted to use mineral oil. All of these bottles had convenient funnel tip which helps to squirt the oil into the transmission box and set the level correctly.

So there you go - it's meet-the-bottle moment (these are full-resolution images):

Gear oil that I've used for my scooter's transmission
Gear oil bottle for transmission oil change on my scooter - back view
Main points about it are
-It is gear oil
-It is rated 75W-90 (wider range is OK)
-It has a funnel tip

The oil is drained from a drain plug on the bottom of the V-belt box. There's really a small amout of it. I drained mine into a glass jar. This fill screw is on the side of the transmission box. Here's a pic:
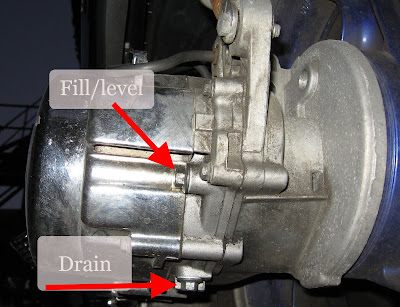
Drain and fill location for transmission oin on my Baron scooter
The screws are M6 and so they take a 10mm wrench or hex sockets.

Notice aluminum gaskets on each of these screws. They get smashed a little by the screws and hold the seal to keep the oil in. It is a good practice to replace these sorts of things, but I just put mine back in.

Draining was easy. I drove it around to warm up the oil a little. Then I stalled the scoot (which means turn off the ignition), put it on a center stand and undone the drain screw. Some dark and really thick oil come out. It really looked like it was long due! (Undo the level screw to let the oil flow out easier.) Since it was so viscous, I had to wait upward of 10 minutes as it just kept oozing out. Then I cleaned the drain screw and its gasket in this very stuff (which in fact becomes a great penetrating oil) and put them back in.

Filling is easy with the funnel-tip bottle. The bottle is flexible, and you just squeeze the bottle to force the stuff in and then let whatever is in excess to flow out. I repeated this to make sure the oil filled all the cavities. Once again, it takes a rather long time for it to drip out. The scoot is supposed to be horizontal for this procedure, so I just did my best to kinda lift the front wheel up a little. I am not sure if this was at all necessary. Then I put the level screw with its gasket back in.

The seals. Since there's no level meter (the level is simply at the position of the fill screw), my biggest worry was that it will leak some oil without me noticing. It got the screws tight with a ratchet, but not crazy-tight as to not to crash the gaskets or break the threads. Then I rode a little and parked the scooter overnight with a piece of paper under this area. Nothing came out so I assume I did this correctly. Still, there was a little grime on the level screw later on when I did this picture.

The ride. The scooter did seam a little quieter and smoother, but hey maybe it's just in my head. I have my idle set too low so the scoot sometimes stalls at intersections. It does seem to happen less often now after the change.

Saturday, July 12, 2008

Trip to Duluth from Minneapolis

I went to Duluth this past 4th of July. This was a 300 miles trip and a major undertaking for me. In fact I never took my scoot anywhere that far. Duluth is a small port city on Lake Superior but in fact a largest fresh water port in the world or something like that. It is a common weekend destination for folks in Twin Cities. After all, this is about the only place you can get to in a day's worth of riding from here :) That is, of car riding. I learned one of friends attempted this on a scooter but wasn't able to get there. His story was he just had to refuel too often and so he turned back. I think he used one of juiced Genuine 50cc scooters for that trip. Well, mine is a 150cc so I had a better chance - but only one short evening to prepare!


View Larger Map

(Normal route would be of course 35W going straight all the way to Duluth harbor area.)

Here's what I did to get ready for the ride:

Changed the oil -- it was long due. Good thing I got some earlier that day. So the whole ride went on fresh oil.

Tightened as many nuts as I found. The wheels seemed tight on :) Checked nuts and bolts on muffler clamps and engine-muffler joint, the kickstands and brake calipers.

Checked the tire pressure. My back tire tends to leak a little. Got it back up to 33psi.

Found out one of my rear shocks is full of dirt and oil. Wiped it all out to see if it's leaking (looks like it does).

Packed some tools. Because I just did an oil change, I tool a 17mm socket and a ratchet in case I have to tighten it a little. Phillips screwdriver for panels battery etc. and a 6mm Allen key in case the mirrors get loose (which happens regularly with mine). Then I came across mount straps that I won at the Rattle My Bones last year. This is the stuff you'd use to mount a scoot on a truck. Since I quite seriously anticipated never making it, I took those as well. None of this stuff became of any use.

Packed some spare things in case of rain. Jacked and a pullover. Long sleeve shirt not to get fried up. Usual gloves and unusual helmet with dark shield. Spare goggles. Water bottles, backpack and a lot of bungee cords to tie it all down once I get tired. A camera and yeah, my tripod. Got some snacks before leaving.

Already on my way, got sunscreen and some maps at a gas station early next day. I have experience burning myself on scoot rides. The wind cools you down and before you know it, it's all done. Given it was going to be at least eight hours of riding under bright sun, I made sure to cover myself as much as possible. Surprisingly, the only "cars" at that station were trucks, SUVs and perhaps some minivans but not a single happy face.

The ride

I got out at about 10:30am. The Cenral quickly became 65th highway - with 65mph speed limit. This was a little stressful but hey at least it has plenty lanes to take over. Whenever the traffic would get heavy, I went at 60mph. However I'd often try to go down to 50mph. The day was hot and I was quite worried not to overheat the engine. 60mph for me is far in the red zone and as fast as I can make it go.

The things soon started to look quite rural. The cars disappeared, and so did any signs of big cities. Forests and farmland - it is really easy to loose track of signs and just keep riding straight ahead. Having to jump highways kept me awake - and hell was it easy to miss some. At some point I took a wrong turn and got onto that very 35W - going back to Minneapolis. I was a long while before the next exit - and I had to take a large piece of the road over again. Then later on Google maps seemed to send me over towards a federal prison, or so the road signs said!

At that point I was on Hwy 123/23 - a great road with beautiful sights. The only problem was it didn't have any gas stations. By the time I got close to Duluth, I was almost empty with the arrow just about to lay flat. But hey I made it! On my way back I tried a side road and found a gas station there. However, some of it was actually closed down by the department of commerce - not an encouraging sign indeed! Here are a few pictures from the trip (all are clickable for a larger image):
Tying down backpack to the rack on my Baron scooter
Banned gas station on my trip from Duluth to Minneapolis
Redneck country - bullet holes in a No-Passing road sign
View on my scooter ride to Duluth; this is highway 23
View from highway 23 on my way to Duluth

The damage

There was of course a good chance that my scoot will simply stop in the middle of nowhere. My biggest worry was the heat and the stress of driving at large speed for so long. The engine could have easily overheated in that day's heat and many-hour riding its max. Or it could be something benign like a molten plastic piece somewhere. Well, I was lucky not to get down with anything like that.
Plastic sidepanel, where the headlights are
A close up for the missing piece

As I was going back, some screws must have finally fell off from the plastic panels on the front fork (the one with the headlights). Some of the joints there must have been broken from flipping the scoot long time ago; once it all got loose, the remaining mounting brackets got more than their share of stress and some must have broken from that. So I took out a little side panel just not to loose it and kept going. The large front panel would make quite some rattle but it stayed put and I was able to finish ok. Surprisingly, the tool that I actually needed --- and of course did not have --- was a roll of duct tape!

Other than this, there was no apparent damage whatsoever. The scoot seems to be doing just fine, it is now at over 6000km.

A little statistics

It took me just over four hours to get back. The weather got colder (I arrived just after midnight), and since the task was complete anyways I was driving at 60mph most of the way. With getting lost and lower speeds, it took me about 6hrs to get to Duluth. So with experience, it is quite possible to have a normal day's trip there on a scooter!

I put on a total of 549km, or about 340mi. I've used just over 5 gallons of gas, and the mileage turned out to be 66 miles per gallon. This is a little surprising given that I'd expect lower mileage driving at my scooter's top speed. On the other hand, there was no stop-and-go thing.

I've spend an exact total of $20.47 for gas on the whole round trip. That is, if you don't count some assholes that turned out to charge my card $5 for some mystical carwash, but that's a whole different story.

Well, as this is getting really long, I'll just stop here. It was hell of a day!

Thursday, July 3, 2008

Oil change and the trip

Just changed my oil, first time since the start of the season (I put in fresh oil after "de-winterizing" of course). I am now at 5445, so that's about 1000km since the last change.

My local bike shop does not have the same old Castrol oil anymore. So I took a similar 10W-40, still for $5:

New bottle for Castrol oil that I use in my scooter
I decided to take a trip to Duluth tomorrow or on the weekend. Duluth is a port on Lake Superior way up north Minnesota, some 150mi from Minneapolis. I detailed the scoot (maybe should be another post) and checked as many nuts as I could --- everything looked O.k. So hopefully I'll be able to make it! Will make a separate post about this once I get to it. Well now it's beer time!

Sunday, June 8, 2008

Scooter cover

My entire first summer I covered my scooter with a scooter cover for the night. This keeps out some rain, some squirrels and probably some assholes. Out of sight -- out of mind, and supposedly using a cover is one of the best things one can do prevent scooter theft and vandalism. I got my cover in a local motorcycle store. It was labeled for smaller motorcycles or scooters and sold for about $35. The only special thing in these covers is special heat resistant layer in the area where the cover touches the exhaust pipe.

Friday, May 30, 2008

How to change oil on a Baron scooter

When it comes to oil, scooters are indeed special. The good news are, there's no oil filter. That's right, zilch oil filters on your scoot. The only exception to this are some really old Vespas. This means no searching for replacement or opening the engine plates like on motorcycles. This also means real fast oil change. The bad news are, there's no oil filter. That means very frequent oil changes. We clean it by throwing it away :)

The "manual" suggests changing oil on my Baron every 500km. The usual suggestion (but not in the manual) is also that one changes the oil more often while the engine is "breaking in", that is first couple thousand kilometer after buying a new scoot. It is in this time that the engine can shed some aluminum chips while "polishing" itself, and you really want them out fast. I've heard of suggestions to change oil every 100-200km for the first 500 or 1000 km. However I didn't do it as often myself as I was trying to find the oil filter replacements in that time :) I normally change my oil between 500 and 1000km.

What you'll need

The brand of oil suggested in the manual is not being produced since 80's or something like that. I use a standard 10W-40 SAE oil for 4-stroke motorcycle engines, made by Castrol.

I use 10W-40 four-stroke oil for my BaronThe important things about this are:
1. It is for four-stroke engines. This is signified by "4T" on the label. Do not use oil for 2-stroke engines on 4-stroke scooters.
2. It is 10W-40 giving enough temperature range. Scooter engines have poor cooling and are prone to overheating.
3. It is a quart bottle, more than you will need for one oil change.
4. It is $4.5o from my local motorcycle store, but can probably get this for cheaper.

Other than a quart of oil, you'll need a narrow-end funnel, a 17mm wrench or hex socket, and some sort of a bucket to drain oil, and perhaps some paper towel ;)

Draining

Oil is drained from a port on the bottom of the engine:

Oil drain plug on Baron scooter
That's right next to the back wheel. The hex head on the drain cap is 17mm. You can undo it with a wrench, but the danger lies in threading the engine when putting it back. A 17mm hex socket and a socket wrench will do you a good service here.

To drain the oil, you'll want your scoot on a center stand. Run it idle for at least two minutes. This thins the oil and helps to get it out. This also makes it hot, so watch out not to burn yourself on engine or the oil. Exhaust will be hot as well. Once I got more skilled at the whole procedure, I would drive it for 5mins or so before starting the oil change.

Once it is warm and firmly on a center stand, put a bucket under the engine. I use a sort of sturdy flat food container with a firm rubber lid. No, I don't put food in it anymore. Less that a quart of oil will come out, so it is easy to pick a suitable container. You may want to cover the area under the engine in case you'll spill some oil.

Unscrew and take out the dipstick.
Dipstick for checking and filling oil on Baron Scooter
It is the black screw-like plastic handle between the engine and exhaust on the pic above. You should have been using it all along to check the oil level. No tools needed, it unscrews by hand.

Undo the oil drain cap. It should come off really easy. Engine is made of aluminum, and it is really easy to blow the thread. Usually as I undo this screw, the oil starts pouring slowly. I then just let the bolt and a few more pieces fall into the oil. I can also use this used oil to wash the pieces from any oil curd that they accumulated.

There are three pieces that come out: the cap (with the hex head) itself, a spring and a mesh bucket. This mesh bucket works as a crude filter. This is what it looks like

Oil drain pieces

Make sure there's nothing stuck on the mesh, around the thread etc. My mesh has a few dents. This happened sometime after the second oil change - must have been something flying around the engine. It never got worse, so I kept the old mesh.

Once the oil stopped dripping (cat take a while), you are ready to put in the fresh stuff.

Here's a view down the drain. Note a hole on the side.

View down the oil change drain hole

Filling fresh oil

Assemble the cap, the mesh and the spring. They go in like like this:

Correct mesh position for changing Baron oil

Once I have this little assembly, I put it back in by hand, and screw the bolt fingertight first. Everything goes in easily. Remember this thing lives in oil :) Once fingertight, tighten it a tad more with a tool. The worst that will happen if it isn't quite tight enough is a slow and fixable oil leak. The drain plug seals with a rubber gasket against the engine. That is, it cannot and should not go in as tight as a normal metal screw.

Fresh oil is added trough the dipstick hole. A narrow funnel is really useful here. It can be hard to tell how much oil to put in. The correct level is set by the lower part of the stick - that is when it is screwed all the way in.

Marks for oil on Baron oil level stick

You don't want to overfill it as undoing the drain bolt should be done completely, which means you will loose all your oil if you have to drain it again. I took a piece of wire and bent it to make a little gauge out of it, comparing it with the dipstick. This can go in and out really quickly to check if I got enough oil already.

Some time after the oil change, you should check the level just in case you may be leaking the oil from the drain plug.

Used oil

Used oil should be recycled - there's all sorts of nasty stuff in it. Any auto store will take oil for recycling in Minnesota. I take mine to Autozone, they point me to a huge drum and I just poor it down. No questions asked.

See also: new oil.

Sunday, April 20, 2008

Tabs

Good thing I remembered to put the registration sticker on before riding out today. The bill came in the winter, which is really dumb as motorcycles and winters don't go together in Minnesota. Anyways, my motorcycle registration was $14.50, which is totally sweet.

Sunday, August 12, 2007

Mileage

The manual promises eighty miles a gallon for my Baron 150SX. I get about seventy. This in fact has been improving slightly since the initial "run-in", and I expect it to get even better with time. At over 200 lbs, I am also not the lightest driver, and I drive rather aggressively. So with all that, being at 70mhg isn't bad at all. Beats the Prius with all its funky technology anyways :)

I kept all receipts except one, and for that I restored how much I pumped from my bank statement. So here's the plot. Horizontal axis is how many gallons I've used. Vertical axis is mileage actually converted to miles. Yes, the "mileage" meter on the dashboard uses kilometers. Divide that reading by 1.602 to get miles.
That's a very consistent 70mpg mileage. Just think what we could have if scooters got popular enough that the manufacturers could economically use fuel saving technologies. Like better materials, fuel injection with exhaust oxygen sensors and so on.

Converted back to kilometers, that's about 115 km per gallon. This is rather convenient - I know I'll have to visit the gas station once the meter clocks another hundred.

Mostly for an experiment, I only use so-called non-oxygenated gas, which is plain gasoline without any ethanol added. As the story goes, there are three reasons named to use ethanol-free fuel.

It doesn't dissolve your engine

Plain gas is supposed to be better on your engine, though I am yet to come across actual evidence for this. Supposedly, alcohol in the gas can soften and dissolve plastics, especially in the carburettor but also in all the piping, fuel pump etc. Of course ethanol can do that, the only question is whether this scooter is made with plastics designed to tolerate some amount of ethanol. All the new cars in America are of course made to handle it well, but this thing is made in China and I have no clue whether it is OK to use "usual" pump gasoline with 10% of ethanol in it.

It does not clog or rust your engine

Water cannot dissolve in gas, but it can do so in presence of alcohol. So the usual, ethanol-enriched gas will soak up any ambient moisture that it is exposed to starting at the factory, traveling in the truck, then sitting in an underground tank at the gas station. If you leave this in your tank long enough, the gas will dry up, the carburettor will clog up whatever can do so will start rusting from within. Rusting is in fact what you call oxidizing iron.

The truth must be somewhere between the first and the second argument. Non-oxygenated gasoline is only legal to be used in Minnesota in boats, motorcycles, collector vehicles (old stuff with carburettors!), and small engines such as lawn mowers. I am sure they would have banned that as well, if only it was possible to feed it with the "oxygenated" fuel.

By the way, they call it non-oxy and non-oxygenated because the oil companies were sued when they tried to advertise it as "ethanol free". This supposedly implied that ethanol is bad and so amounted to defamation. Pretty weird, huh?

Non-oxy fuel gives you better mileage

This one is supposedly true. Mileage is supposed to go up by as much as 30%. Well, not that I am complaining at mine :)

How to find the stuff

I get mine at the gas station hosted by a company that repairs boats. I found it online, and you could perhaps Google it up for your area. If you do, please leave a comment! I will also post the stuff that I found for Minnesota.