The crack was smashed by some morons when parked at a lake, and the liquid is the brake fluid. No I didn't taste it. But it does have a special feeling to it. Just rub some between fingers, then call 911 in panic.
First I took off front handlebar cover. This is now a separate post since this seems to be quite a repeating procedure :(
It looked as though the fluid is leaking from right under the master cylinder somewhere around the place where brake lever pushes it in. So I took on disassembling the thing.
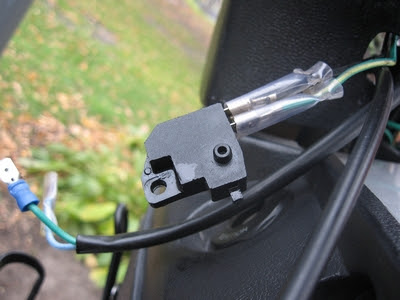
First I removed the brakes button. It is attached with a tiny screw and a full shebang of plain and split lock washers. It also fits into the brake fluid tank with a small pin but that is not fastened to anything:

Taking off the lever only takes undoing one bolt:

It is M6 so it fits 10mm sockets and wrenches.

The nut has wings in the thread that cut into the bolt. This is apparently a version of a stop nut, but it will not survive being tightened too many times.
Once the lever is off, I could simply slide off a rubber gasket that protects the piston from dust and whatnot. Mine was super badly cracked from what life had for it. This is also similar to other rubber pieces that I discovered are quite cracked. Perhaps they weren't stored right before assembly.

Picture doesn't do it much justice, that thing pretty much fell apart. I now feel attached to it.
Behind the gasket was a retaining ring holding the piston in place. Or so it seemed it should be doing, but it certainly didn't as the ring had jumped off it's socket. Or maybe it never was in place. This seems to have been my only problem.
Once I got the washer out, the whole piston came out.

The thing is surprisingly long

and full of grime, too.
Didn't have my ruler handy, so in case I have to replace it, I took this picture. Apparently they cut them out of pennies, which would explain the quality. Also, appreciate my close photography skill.

This is to show where the ring fits on the piston. The front groove is for the rubber gasket.

It seemed that all I had to do was to fit the ring back in. There's a small groove on the inside of the tank where the ring fits to hold the cylinder in place. The problem was it is just damn too far from the front of this channel, and I just couldn't find retaining ring pliers with pins long enough. Neither would it reach from the side. I replaced those with something makeshift, but the long pins just weren't sturdy enough to bend the the ring.
The whole project took over a week, scoot parked dead with a rubber stopper firm in the brake fluid tank. Which was a crime in progress as these were the last good weather days we've had this season.
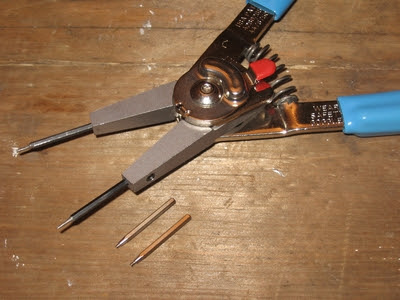
I ended up cutting my own pieces for my Channellock retaining ring pliers. It's advantage is in that it has interchangeable pieces that are held in place by a simple stop screw. The pieces themselves are quite apparently made of something suspiciously reminiscent of 3/32" Allen wrenches. At least they are hexagonal and the right size.
I got a few 3/32" hex keys from Ace Hardware for refreshing quarter a piece. Cut the bent part, and ground the other end on a tool sharpening disk. Well, I guess this is a tool, isn't it :) A touch of dremel would have probably worked fine, too. Just rotate the key to grind it down evenly.

This was enough to get the ring just next to thew groove. I had to take the throttle rocker off to get better access. There's a single nut holding the sleeve together and tightening it to the handlebar, right where the cable comes in. Loosen the nut and the throttle slides off. In fact, mine was pretty loose. Messing with the throttle will be like another post.
To get the ring in place, I just slid in a long flat screwdriver and gave it a few blows around the piston. And in it went!

Now that I think about it, a piece of pipe fitting around the piston may have done the whole job, if only the ring wouldn't get stuck dead in the channel (it is covered has a kind of very small groves on it, almost like for extra friction).
Well, that was it, the brakes worked in fact. Added extra fluid and bubbled it with the piston like I wrote in topping the brake fluid post.
I was all ready for that last Sunday ride of the season, and hey I didn't break anything in the process. To finalize such an awesome event, I decided to flush the fluid completely. In fact, you are supposed to change the brake fluid once a year or so as it seeps up moisture, and the winter was around the corner. To make the long story short, I managed to drain it through the bleed screw on the caliper, top it up and bubble it from the tank. This wasn't the whole deal as one is supposed to bleed the brakes when changing the brake fluid. And in that process I threaded the bleeding screw. Sure enough, screw is done of harder metal.
So to hell with the ride, I am stuck next week looking for and replacing the front brake caliper. Which is like, another post.
2 comments:
Wow thats a helpful post.
I've a chinese made scooter.
The brake fluid box at the (right) handle, has a glass (rubber) window to check oil-levels. In an year or so, the window slowly melted and oil started leaking.
Am looking for a quick fix.
Seal the window with a penny, may be. :))
Thanks for the post.
I am very much pleased with the contents you have mentioned. I wanted to thank you for this great article. brandon auto mechanic
Post a Comment