Sunday, September 16, 2012
New looks
The blog gets new looks! There is also now a functioning mobile phone version, hopefully useful. And I got a better search panel. And even an update subscription service.


Sunday, August 7, 2011
Reset forum
The forum got so bogged with spam, I unfortunately had to reset it. The software that I used to run the forum, the bbpost, simply did not allow me to perform any "bulk" actions to remove the spam. So now the forum is still there, but completely clean like brand new. Give it a try if you want, I will for one make sure to try and answer your question. Then again, you can simply leave your comments here.
Friday, November 6, 2009
CAPTCHAS
I am committed to keeping the comments on this blog open without any special registration with Blogger etc. Yet this is getting difficult as I am getting large amounts of spam comments. For this reason I'm adding captchas, the little distorted word images that one needs to recognize before being able to post comments. I am sure you've seen a ton of those. This way comments may still be anonymous, without any ID/password or registration.
Tuesday, February 17, 2009
New hosting for the manual
I am putting the manual in a new place, on the same site that hosts the forum. This should be faster and without any advertising interruptions. Here's the link: BaronScooterManual.pdf
Saturday, January 17, 2009
Where's my rear brakes tank cover?
150cc Barons have both front and rear disk brakes. This is great and gives for a safe and fun riding, but you may have been wondering where the hell is the tank for the brake fluid for that rear. Well it used to be the rear brakes were drums, and Baron haven't yet put an access port for the rear brakes fluid tank. The tank (aka tiny aluminum box) is exactly the same as for the front brakes, and is located symmetrically on the left side of the handlebar. You have to take off the entire front cover to get to it, however.
Check out the forum!
I've put together the forum where it will be easier to exchange information and to preserve it over time - way better than comments. The forum is located here:
http://www.scooterblog.yarkolts.com/forum/
Please visit if you'd like to leave some comments or ask for help for your scoot. I will be checking the forum regularly, too. The place is empty but hey somebody's got to be the first one to post! At this time, you can post or create new topics without any registration mess, if you'd like to do so.
http://www.scooterblog.yarkolts.com/forum/
Please visit if you'd like to leave some comments or ask for help for your scoot. I will be checking the forum regularly, too. The place is empty but hey somebody's got to be the first one to post! At this time, you can post or create new topics without any registration mess, if you'd like to do so.
Tuesday, December 16, 2008
Moving and selling
I moved out of the Twin Cities in the middle of last month and had to sell my scooter. I was in fact still with the broken cable, so I gave it away to a friend for rather cheap. I hope he will fix and make some good use of it - and perhaps even contribute to these pages one day!
In the mean time, I will finish some small posts that I always wanted to do but never really had time for. Perhaps I'll get to it later this winter. I will also be opening a web board. I would like to create a permanent place online where this sort of scooter experience can be shared and stored.
I am now in Barcelona, a city ranked number two in the number of scooters (per head?). The things are literary everywhere, quite a teaser. I will however be a while before I can get one of my own.
In the mean time, I will finish some small posts that I always wanted to do but never really had time for. Perhaps I'll get to it later this winter. I will also be opening a web board. I would like to create a permanent place online where this sort of scooter experience can be shared and stored.
I am now in Barcelona, a city ranked number two in the number of scooters (per head?). The things are literary everywhere, quite a teaser. I will however be a while before I can get one of my own.
Monday, October 20, 2008
Friday, September 12, 2008
Throttle
So my throttle cable had in fact broken inside the housing. It is in quite rusty and dead-looking in many places. What this means is there probably never was any oil put on it, even though it should have been lubricated at the factory. Any king of initial lubrication should have lasted to this point. Because the throttle never felt too stiff, I never got to lubricating the cable myself, though probably should have. The lesson here is obviously to lubricate your cable before it's too late.
Tuesday, September 9, 2008
Thottle cable snap-off
Apparently my throttle cable snapped off this evening. The throttle handle turns and moves the cable, but there's no effect on the engine which stays at idle speeds. This was probably in the making for quite a while as I felt slight but really weird slipping in the throttle handle from some time ago. The funny part is, it snapped right on the highway.
I figured leaving it right there will probably mean towing, and towing means money and inevitable damage as there's no easy way to transport a scooter with a standard tower especially without a centerstand, and that means even more money. And in any case I wouldn't want to leave my fave toy to some weird police people. So I pushed it towards exit which happened to be quite close. Good thing this was in the city. Anyways after I pushed it out it only made sense to keep going. Just checked - I went about 1.5 miles. Mostly on the curb but sometimes on the side of the road. The scary part was getting it out of the highway - it was quite dark and there was plenty of traffic.
Anyways, remember I hoped I wouldn't get all the possible breakdowns on my Baron? Just forget about it.
The learning is of course not to push the throttle to hard when twisting it all the way. I.e. twist it all the way but don't cram it in there. No surprise it snapped on the hightway.
I figured leaving it right there will probably mean towing, and towing means money and inevitable damage as there's no easy way to transport a scooter with a standard tower especially without a centerstand, and that means even more money. And in any case I wouldn't want to leave my fave toy to some weird police people. So I pushed it towards exit which happened to be quite close. Good thing this was in the city. Anyways after I pushed it out it only made sense to keep going. Just checked - I went about 1.5 miles. Mostly on the curb but sometimes on the side of the road. The scary part was getting it out of the highway - it was quite dark and there was plenty of traffic.
Anyways, remember I hoped I wouldn't get all the possible breakdowns on my Baron? Just forget about it.
The learning is of course not to push the throttle to hard when twisting it all the way. I.e. twist it all the way but don't cram it in there. No surprise it snapped on the hightway.
Sunday, September 7, 2008
Inspection check list
I will be accumulating notes here that I think should be checked on the scoot once in a while. Most of these are nuts that need to be tightened - and that is really a weak spot for Chinese scooters. If you want to save yourself some repairs, check these things once you buy your scoot and than say at the beginning and the end of the riding season.
Nuts and bolts to tighten:
Nuts and bolts to tighten:
- Nuts holding the exhaust pipe brackets. These fall off, but not in my case.
- M6 studs holding your exhaust pipe pressed against the engine. These also fall off.
- The rear wheal axle nut. Yes, this one can be loose as well.
- The front fork bolt. I'll post some pictures.
- Bolts holding the centerstand.
- Bold holding the switch on the kickstant. You'd have to take the switch off to get to the main nut.
- Bolts holding the mirrors.
Kick stand
I was replacing my broken kickstand today. Because my centerstand has broken as well, this was quite an emergency :) I got a used replacement from my dealer.
To get to that area, I had to remove lower left side panel first. This is one of the grey panels that sort of wrap underneath the scoot. It is fixed by a bolt and a bunch of screws, some under the "carpet".
The leg itself is fixed by a special bolt in its bracket. The bolt has a thread in it for the detector which shuts down ignition once you kick it open. The further side of the bracket has a thread in it, so there isn't a nut for this bolt.
The hardest part is the spring. It is tight enough to make it impossible to just stretch it with hands. The trick is to hook both ends of the spring and then work the leg into the bracket sort of pushing it against notches on the frame so that the holes align.
This is what it looks like:

The part hanging is the shutoff switch. It goes over the bolt, and has a groove to hang to the little post above the bolt. Notice there's a little hole under the bolt on the kickstand leg. There's a small pin on the switch that goes in there.
Here's the whole thing mounted. I had to replace the smaller bolt with my own. This is a regular 25mm-long 6M stainless steel bolt with a couple washers. You have to jam it into the thread rather hard. It is not meant to push against the switch as these move separately.

Tools: The large bolt takes a 14mm socket, and the smaller one a 10mm one. You'll also need 10mm socket and a regular Phillips screwdriver to remove the panel.
Related posts:
So my small kickstand just fell off
Broken centerstand
To get to that area, I had to remove lower left side panel first. This is one of the grey panels that sort of wrap underneath the scoot. It is fixed by a bolt and a bunch of screws, some under the "carpet".
The leg itself is fixed by a special bolt in its bracket. The bolt has a thread in it for the detector which shuts down ignition once you kick it open. The further side of the bracket has a thread in it, so there isn't a nut for this bolt.
The hardest part is the spring. It is tight enough to make it impossible to just stretch it with hands. The trick is to hook both ends of the spring and then work the leg into the bracket sort of pushing it against notches on the frame so that the holes align.
This is what it looks like:

The part hanging is the shutoff switch. It goes over the bolt, and has a groove to hang to the little post above the bolt. Notice there's a little hole under the bolt on the kickstand leg. There's a small pin on the switch that goes in there.
Here's the whole thing mounted. I had to replace the smaller bolt with my own. This is a regular 25mm-long 6M stainless steel bolt with a couple washers. You have to jam it into the thread rather hard. It is not meant to push against the switch as these move separately.

Tools: The large bolt takes a 14mm socket, and the smaller one a 10mm one. You'll also need 10mm socket and a regular Phillips screwdriver to remove the panel.
Related posts:
So my small kickstand just fell off
Broken centerstand
Saturday, September 6, 2008
Xenon lights
I am having constant problems with my lights, by here's a guy who seems to have his problems figured out with HID (high-intensity discharge headlights a.k.a. Xenon bulbs):
http://www.scootercommunity.com.au/forums/t/2943.aspx
http://www.scootercommunity.com.au/forums/t/2943.aspx
Compatibility: Avispa Verucci
Here's one more of the same: Avispa Verucci scooter. I think Verucci is the brand and Avispa is the name for the 150cc model.


Friday, September 5, 2008
Planned repairs
I went to my dealership this Thursday and picked a whole bunch of stuff that I needed to replace. This included both stands, lenses for the rear light and an 18 Watt front headlight. Can't wait to finally fix all these things.
Thursday, September 4, 2008
How you can support this site
When searching the web for information, I usually feel quite grateful finding little bits and pieces that were put there by all sorts of hobbyists or enthusiasts. It used to be, the better the page, the faster I was able to get the info and get out of there to work on my own stuff. This has changed quite a bit since I started this site last year.
This site has in fact began to draw some people this past summer. Enough to make it meaningful to keep putting my time into it, but insufficient to make it sustainable. Given large enough number of users, we could have a forum to share experience. I could also post content from other people. I'd hope I won't eventually get every possible breakdown!
Large number of visitors would warrant purchasing a spot to at least host download files such as the manual or even the entire site. The adds have not yet translated into any actual cash in my pocket. I am mostly doing them to figure out how this stuff works. All expenses have to my own and this only makes sense if there is sufficient number of people benefiting from it.
These days, when I come across a site that I find genuinely helpful, I don't just grab-and-run. Instead, I try to give something back. Usually it is not the money, but some other internet-valuables. Mostly, I try to leave links to such sites either on my own pages or forums or any other place online. This draws in more visitors - and the hosts can decide themselves what they want to do with it. If you want to help this site, think for a second if there's any way you could mention it or just leave a link somewhere. At this point, there is exactly zero links to this place in the whole world wide web (or so Google tells me). Yours could be a 100% change! This being said, of course please don't go around spamming.
Another and much more involved way to contribute is to write about you own experience. This could be riding experience, advice for beginners, or a description of some repair or modification. Reviews of dealers or store experience would be great as well! If you feel like contributing in this way, let me know! Just leave a comment here and I'll send you an email.
This site has in fact began to draw some people this past summer. Enough to make it meaningful to keep putting my time into it, but insufficient to make it sustainable. Given large enough number of users, we could have a forum to share experience. I could also post content from other people. I'd hope I won't eventually get every possible breakdown!
Large number of visitors would warrant purchasing a spot to at least host download files such as the manual or even the entire site. The adds have not yet translated into any actual cash in my pocket. I am mostly doing them to figure out how this stuff works. All expenses have to my own and this only makes sense if there is sufficient number of people benefiting from it.
These days, when I come across a site that I find genuinely helpful, I don't just grab-and-run. Instead, I try to give something back. Usually it is not the money, but some other internet-valuables. Mostly, I try to leave links to such sites either on my own pages or forums or any other place online. This draws in more visitors - and the hosts can decide themselves what they want to do with it. If you want to help this site, think for a second if there's any way you could mention it or just leave a link somewhere. At this point, there is exactly zero links to this place in the whole world wide web (or so Google tells me). Yours could be a 100% change! This being said, of course please don't go around spamming.
Another and much more involved way to contribute is to write about you own experience. This could be riding experience, advice for beginners, or a description of some repair or modification. Reviews of dealers or store experience would be great as well! If you feel like contributing in this way, let me know! Just leave a comment here and I'll send you an email.
Saturday, August 30, 2008
How to convert your scooter's odometer to miles
The odometer on your Chinese scooter most likely shows the distance traveled in kilometers. This is often the case even if the manual or your dealer says it will actually be in miles. You can check this of course by traveling a short distance, writing down the readings and then checking the distance against your favorite maps website, i.e. Google Maps.
To convert kilometers to miles, simply divide by 1.602 . That is , 1km = 1/1.602 mi = 0.624 mi.
To convert kilometers to miles, simply divide by 1.602 . That is , 1km = 1/1.602 mi = 0.624 mi.
Broken centerstand
My center stand broke today as I tried to park at a store. Because the kickstand has broken some time ago and wasn't replaced, I have no normal way to leave my scooter anymore. So I have to sit on the whole day. Kidding. I ended up riding back home and jamming the scoot between my house and fire staircase. Fortunately enough the spot is just wide enough to hold the scoot. The odometer is now at 7028 km - that's about 4400 miles.
Sunday, August 17, 2008
Gravel
It's that time of the year again - the city of Minneapolis fills its emergency rooms by covering road with loose gravel. This is supposed to heal the roads a little, but it also means scores of people who loose control of their vehicles and skid on this stuff. You probably know this already from driving your car, but things are way worse for the scooters. Scooter on gravel road is sort of like a cow on ice (or at least that's how I imagine cows on ice). The hardest part comes when you slow down or take a turn (think of turning from a normal road to one with gravel). The wheels tend to lock and the scoot starts skidding. Scoot carefully!
Thursday, July 24, 2008
Changing transmission oil on my scooter
It is normally recommended that scooter transmission oil be changed at least once a year. Once I hit 6000km - probably more then a typical year's worth of riding - and especially after that long ride to Duluth, it seemed like transmission oil change for my Baron was due.
There are three types of oil you can find in motorcycle and auto stores, besides the cleaning/penetrating types. These are various types of engine, automatic transmission fluid (ATF) and gear oil. While our scoots have "automatic" transmission, the V-belt transmission works quite different from car's AT and what I believe should be used for scooters is the gear oil. This is the stuff that goes into manual transmission boxes and perhaps other machinery. Gear oil is standardized similarly to engine oil, by a range of viscosity. I dug online a little and found suggestions to use 75 to 90 W oils for scooter transmission. This is exactly what I'll be going for.
It is a good time to remind you that I am not in any way offering a professional advice on these pages.
What I found in AutoZone was a cheep and very convenient bottle of 75-90W, exactly what I needed. It cost about $6. The most expensive one from Mobile-1 (with a larger range, up to something like 140W), was about 15$. The bottle is so big it will last a lifetime, I just wanted to use mineral oil. All of these bottles had convenient funnel tip which helps to squirt the oil into the transmission box and set the level correctly.
So there you go - it's meet-the-bottle moment (these are full-resolution images):


Main points about it are
-It is gear oil
-It is rated 75W-90 (wider range is OK)
-It has a funnel tip
The oil is drained from a drain plug on the bottom of the V-belt box. There's really a small amout of it. I drained mine into a glass jar. This fill screw is on the side of the transmission box. Here's a pic:
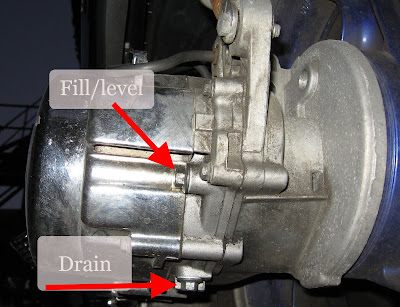
The screws are M6 and so they take a 10mm wrench or hex sockets.
Notice aluminum gaskets on each of these screws. They get smashed a little by the screws and hold the seal to keep the oil in. It is a good practice to replace these sorts of things, but I just put mine back in.
Draining was easy. I drove it around to warm up the oil a little. Then I stalled the scoot (which means turn off the ignition), put it on a center stand and undone the drain screw. Some dark and really thick oil come out. It really looked like it was long due! (Undo the level screw to let the oil flow out easier.) Since it was so viscous, I had to wait upward of 10 minutes as it just kept oozing out. Then I cleaned the drain screw and its gasket in this very stuff (which in fact becomes a great penetrating oil) and put them back in.
Filling is easy with the funnel-tip bottle. The bottle is flexible, and you just squeeze the bottle to force the stuff in and then let whatever is in excess to flow out. I repeated this to make sure the oil filled all the cavities. Once again, it takes a rather long time for it to drip out. The scoot is supposed to be horizontal for this procedure, so I just did my best to kinda lift the front wheel up a little. I am not sure if this was at all necessary. Then I put the level screw with its gasket back in.
The seals. Since there's no level meter (the level is simply at the position of the fill screw), my biggest worry was that it will leak some oil without me noticing. It got the screws tight with a ratchet, but not crazy-tight as to not to crash the gaskets or break the threads. Then I rode a little and parked the scooter overnight with a piece of paper under this area. Nothing came out so I assume I did this correctly. Still, there was a little grime on the level screw later on when I did this picture.
The ride. The scooter did seam a little quieter and smoother, but hey maybe it's just in my head. I have my idle set too low so the scoot sometimes stalls at intersections. It does seem to happen less often now after the change.
There are three types of oil you can find in motorcycle and auto stores, besides the cleaning/penetrating types. These are various types of engine, automatic transmission fluid (ATF) and gear oil. While our scoots have "automatic" transmission, the V-belt transmission works quite different from car's AT and what I believe should be used for scooters is the gear oil. This is the stuff that goes into manual transmission boxes and perhaps other machinery. Gear oil is standardized similarly to engine oil, by a range of viscosity. I dug online a little and found suggestions to use 75 to 90 W oils for scooter transmission. This is exactly what I'll be going for.
It is a good time to remind you that I am not in any way offering a professional advice on these pages.
What I found in AutoZone was a cheep and very convenient bottle of 75-90W, exactly what I needed. It cost about $6. The most expensive one from Mobile-1 (with a larger range, up to something like 140W), was about 15$. The bottle is so big it will last a lifetime, I just wanted to use mineral oil. All of these bottles had convenient funnel tip which helps to squirt the oil into the transmission box and set the level correctly.
So there you go - it's meet-the-bottle moment (these are full-resolution images):


Main points about it are
-It is gear oil
-It is rated 75W-90 (wider range is OK)
-It has a funnel tip
The oil is drained from a drain plug on the bottom of the V-belt box. There's really a small amout of it. I drained mine into a glass jar. This fill screw is on the side of the transmission box. Here's a pic:

The screws are M6 and so they take a 10mm wrench or hex sockets.
Notice aluminum gaskets on each of these screws. They get smashed a little by the screws and hold the seal to keep the oil in. It is a good practice to replace these sorts of things, but I just put mine back in.
Draining was easy. I drove it around to warm up the oil a little. Then I stalled the scoot (which means turn off the ignition), put it on a center stand and undone the drain screw. Some dark and really thick oil come out. It really looked like it was long due! (Undo the level screw to let the oil flow out easier.) Since it was so viscous, I had to wait upward of 10 minutes as it just kept oozing out. Then I cleaned the drain screw and its gasket in this very stuff (which in fact becomes a great penetrating oil) and put them back in.
Filling is easy with the funnel-tip bottle. The bottle is flexible, and you just squeeze the bottle to force the stuff in and then let whatever is in excess to flow out. I repeated this to make sure the oil filled all the cavities. Once again, it takes a rather long time for it to drip out. The scoot is supposed to be horizontal for this procedure, so I just did my best to kinda lift the front wheel up a little. I am not sure if this was at all necessary. Then I put the level screw with its gasket back in.
The seals. Since there's no level meter (the level is simply at the position of the fill screw), my biggest worry was that it will leak some oil without me noticing. It got the screws tight with a ratchet, but not crazy-tight as to not to crash the gaskets or break the threads. Then I rode a little and parked the scooter overnight with a piece of paper under this area. Nothing came out so I assume I did this correctly. Still, there was a little grime on the level screw later on when I did this picture.
The ride. The scooter did seam a little quieter and smoother, but hey maybe it's just in my head. I have my idle set too low so the scoot sometimes stalls at intersections. It does seem to happen less often now after the change.
Subscribe to:
Posts (Atom)